Hybridizing Hostas
I decided to try my hand at hybridizing hostas for the first time this year. With well over 1,000 plants in my collection, all conveniently located in the same place, and therefore the possibility of so many different combinations of plants to cross (around 600,000 assuming that all of them are fertile, all of pollen is viable, there are enough flowers produced and I’m able to store pollen to facilitate differing flowering times) it seemed like an obvious thing to do. The thought of making and maybe even naming and registering my own special plants was appealing. I had a feeling though that creating a truly unique, or even a mildly interesting plant, wasn’t going to be straightforward.
I did my research to find out the basic principles of hosta hybridizing (which I’ve listed listed below) and looked at the methods used by experienced, established hybridizers. I’ll give my thoughts and my own experiences with these methods, review the initial results of the crosses and then consider what I intend do differently next year. I’m sure there will be another year of hybridizing and hopefully many more after that!
The Basics
Most hostas cross-pollinate relatively easily, although some are sterile and others are reluctant to set seed. A list of these types can be found on this site http://www.hostalists.org/hosta_list_sterh.php
The mother plant is referred to as the pod parent & the father plant as the pollen parent
The vast majority of seedlings from plain or variegated pod parents will also be plain. The seedling’s leaf colour will usually be the same colour as its pod parent’s (or the leaf centre if the pod parent has a variegated leaf) but, depending upon its ancestor’s genetics, it may be a different colour. Less than 1 in 1,000 seedlings from plain or variegated pod parents will be variegated and even fewer will be streaked.
The best way to get variegated seedlings is by using streaked pod parents. The reason for this is as follows : The genes in hostas are relatively unstable compared to most plants. They have 3 layers of cells which can be genetically different. Two of these, L1 & L3 form the visible parts of the leaf, the outer and inner parts respectively. If they are have different genes for colour then they will be variegated. In streaked hostas, these layers are mixed together, a characteristic which is often passed from mother to child, resulting in streaked seedlings. However, in most streaked hostas, the 2 layers are constantly working to separate from each other, which will eventually lead to stable variegated offspring.
A streaked pollen parent won’t produce a variegated seedling any more frequently than a plain leafed pollen parent.
Whereas streaked parents can give rise to 6 types of coloured seedlings (including a significant proportion of streaked seedlings as described above but also plain, medio-variegated etc) misted leafed parents (such as Split Milk) give rise to almost all misted seedlings.
Dominance. As in all genetics, certain genes are dominant over others. So, where two types of genes are present together, the characteristic of one will often prevail. Naturally, this has implications for the selection of characteristics in hybridizing. Some of the dominant genes which have been identified by hybridizers are as follows : (1) Lavender flower colour is dominant over white, (2) flower fragrance is dominant over no fragrance, (3) purple petiole colour appears to be dominant over green and (4) yellow leaf colour appears to be dominant over green
The Vision
When it comes to the ‘why?’ of hybridizing, conventional wisdom dictates that the hybridizer should always have a vision or end goal in sight. That could be, for example, to extend the red colour of a petiole into the whole leaf of a hosta, or to produce a blue, red or orange-coloured flower. Having a purpose like this tends to focus the mind. When there are an almost infinite number of combinations of possible crosses, this can be important in preventing a somewhat scatter-gun approach. However, whilst I do agree with this advice to a large extent, I also think it’s important for any would-be hybridizer to experiment. By all means, understand and apply some of the principles identified by others, but also build your own experience. Find out first hand the result of a particular cross, make your own mistakes and learn from the process. Too much regimentation can restrict inventiveness and innovation.
Having said that, I did have a few ideas in mind. However, in the spirit of experimentation, I didn’t want to restrict myself to just one! Firstly, I wanted to make big hostas with a twist (metaphorically speaking). So I used Elatior, Empress Wu, Devon Giant, Blue Mammoth, Big Daddy with, for example cupped, rugose or red-petioled partners. I also wanted to pursue the red petiole and ultimately the red leaf goal. So here I crossed a number of hostas with these characteristics such as Red Bull & Gooseberry Sundae. I like fragrant hostas, so I used some of these in the mix. Finally, and rather predictably I have to admit, I wanted to get as many streaked, misted or variegated seedlings as possible. I was keen therefore to use all of my (invariably expensive) plants with these characteristics.

Pollination
The first decision to be made when pollinating is whether to control the crosses (ie perform them manually) or let the bees do the work (referred to as open pollination). Given that I has some ideas of the crosses that I wanted to do, I opted for the former.
There are a few ways of ensuring that the bees don’t make it to the flowers before the hybridizer. Pollinating early in the morning (around 6am) and then removing all of the petals & sepals from the flower is one way. Moving the plants into an enclosed area is another. Obviously this can only be done if the hostas are in pots – if they’re in the ground, an alternative is to tie a bag over them before the pollen ripens As my collection is largely in a netted shade tunnel, I felt that no precautions, other than closing the tunnel doors, were necessary.
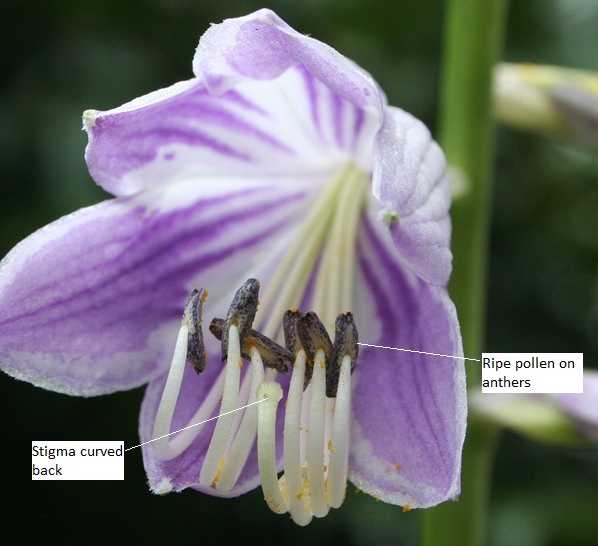
Although it’s possible to remove and store pollen in the fridge or freezer well before making the cross (useful to faciliate crosses between varieties with different flowering times), I opted to do my crosses ‘real-time’. Noting that the pollen needs to ripen into in order to increase its viability (indicated by a golden-brown colour and ‘fluffy’ txture) and the stigma needs to be receptive (indicated by the style curving back on itself), I found myself faced with a choice of pollination techniques. Some people recommend using a paint brush to collect and apply the pollen; actually, a set of paint brushes is really needed to avoid cross-contamination of the pollen between applications. Others use a cotton bud. I found that pulling off the individual filaments, either with my fingers or using tweezers for very small flowers, and applying the pollen directly from the anthers onto the stigma, worked fine.
Labelling the crosses
Once the crosses have been made, it is very important to label each flower, or, if a whole scape has the same pollen parent, then just one flower per scape. Following conventional wisdom, I used jewellery tags made from thin card and tied with fine cotton. I picked them up from e-bay for less than 1p per tag. I wrote the name of the pollen parent on one side and, for back-up, a number on the other, which I noted along with the pollen parent on a spreadsheet. Unfortunately, due I think to watering of the plants from above with sprinklers, I found that a significant proportion of the labels either fell off the scapes or the writing on them faded making it illegible.
The back-up plan kicked in then. So, for all the pod parents on which I’d used only one pollen parent, I should be able to match the exact pollen parent from my records, right? As it turned out, not quite. I noticed that somehow, quite a few flowers which I hadn’t pollinated myself had produced seedpods. I assume that a few rogue bees had sneaked into the tunnel when I wasn’t looking and had gone about their business unperturbed. This meant that, whilst the likelihood was good that all of my own crosses were as recorded, I couldn’t be 100% certain; particularly where the labels had been lost and hence where I couldn’t match the exact pollinated flower to its label. I suppose the good news was that the bees had helped increase my potential stock of seedlings. The bad news though was that the pod parents they’d chosen to pollinate were mostly the older, less interesting varieties in my collection.
As a result of all of this, I bought 500 small, round, lightweight aluminium labels from AliExpress. They are 25mm in diameter, 1mm thick, weigh just under 1g and cost about 10p each. I intend to right numbers on each of them and record each cross by number on an excel spreadsheet. Hopefully, these labels will last for a long time!
Collecting & Sowing the seeds
The seed pods began to form about 2 weeks after pollination and I continued the process of selective crossing into autumn. The pods were ripe enough to pick and store when the turned a dark brown colour and were ‘crispy’ in texture.
The success rate in terms of successful germination & forming of seeds pods compared to the toal number of selective crosses made was only just over 25%. Out of a total of 78 crosses made (some of which included multiple flowers on the same plant crossed with the same pollen parent) 21 produced some seed pods. I must admit, I was a little disappointed by this, especially as many of the crosses I was most interested in making failed to produce seed. Such is the frustration of the budding hybridizer I guess! A further 22 Open Pollinated crosses successfully produced pods, resulting in a total seed count of around 1,200.
Successful germination of the seeds requires warmth and growth of the seedlings requires light. Providing both of these in the winter or even early spring is a challenge. Some hybridizers will wait until late spring to sew the seeds outside or in an unheated greenhouse. Many however, who want to give the seedlings a head-start in their first potential growing season, will sow them under 24 hour lights in their basement. I elected for a middle way. I made a heated propagation bench in my otherwise unheated greenhouse and sowed the seeds in very early February.
The bench was 10ft x 3ft with a plywood base and 9 inch wooden sides. A 3 inch thick layer of insulating material was placed on the base, then a heavy duty plastic sheet (which was secured up the sides of the bench for waterproofing), followed by a 3 inch layer of sand. An 85ft heating cable was laid on the sand like an electric blanket with a 4 inch distance between the cable lengths and a thermostat atttched. Finally, another 3 inch layer of sand was added to the top. The total cost of the parts was around £120. This size of bench, provides space for germinating about 30 medium-sized seed trays. This year, using 40 compartment insert cells in each seed tray, and planting about 4 seeds per cell, I only needed 7 trays. Space may get a little tighter later though when the seedlings need planting on, if they still require bottom heat!
The Results
The table above shows the 78 crosses which I made and the resulting seed pods produced. There were an additional 22 Open Pollinated (OP) crosses from which I also obtained seed-pods and sowed the seed.
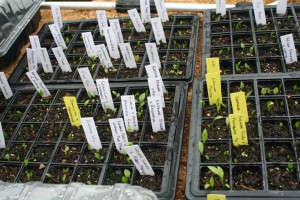
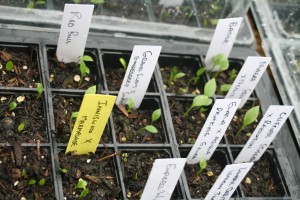
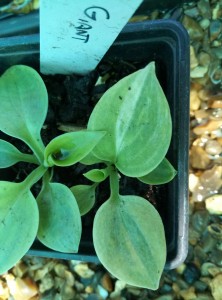
The photos below show the seeds about 5 weeks after sowing. At this stage, most of them look remarkably green!


